- Published on
Unit testing Django applications using Pytest!
What's the one of the most important and often overlooked parts of software applications from web applications, mobile applications to Cloud Native application? Unit tests of course! Unit tests are an integral part of any software application because they allow for the detection of bug/defects, improve maintainability of code and aid in regression testing when making updating existing code-bases.

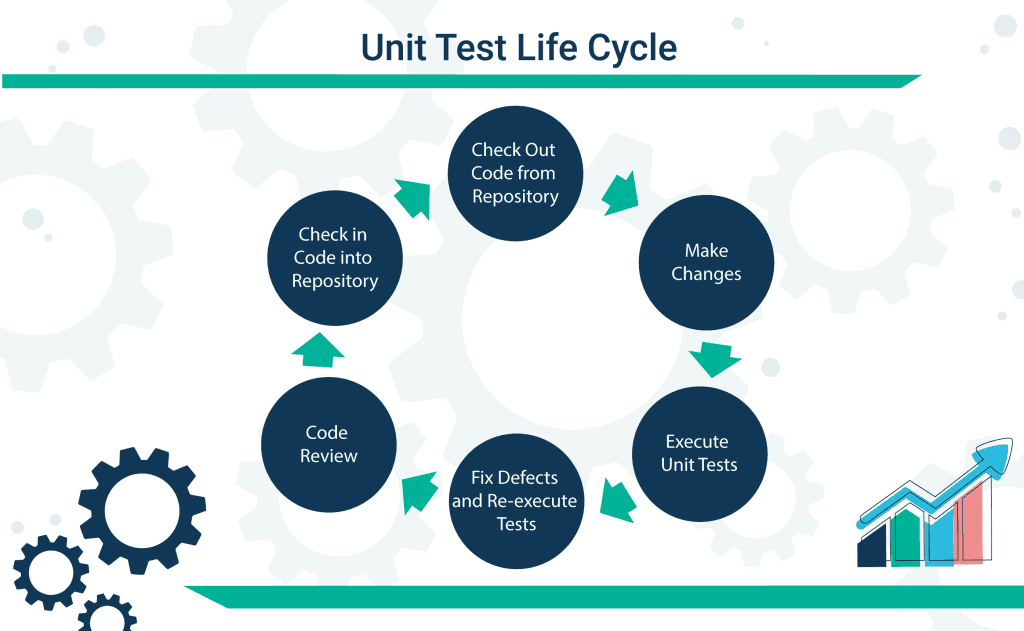
Figure 1: Diagram detailing the unit testing process!
In this blog post, we will show you guys how to write basic unit test using Pytest for Django applications so without further ado, let's jump right in!
Setup
To begin unit testing with Pytest we will need the pip package manager installed. If you don't have pip installed then refer to this article by opensource.com on how to do so.
Now with pip installed, we can install pytest via the following command:
pip install -U pytest
Then as a sanity check, running the following command to see the version of pytest that was installed:
pytest --version
Next we'll need a sample python application to run our basic unit tests on. If you don't have one, feel free to clone this simple blog application here, as this is the application to be used in this blog post.
Then, make sure to activate a virtual environment when in the root folder of this project by running the following command:
python -m venv virtual_env
As the previous command created the virtual environment folder, we now have to activate it using this command:
source virtual_env/Scripts/activate # for Windows users
source virtual_env/bin/activate # for Linux and Mac users
Great! You're now in a Python virtual environment. Moving on to the testing section...
Testing
To begin let's start out by creating a 'tests' folder in the root folder. After this, let's create a file called conftest.py inside the newly created 'tests' folder.
When beginning the unit testing process it is important to have a file to hold configuration data. When a single file holds the logic for configuring the unit tests, we enforce the DRY principle by reducing code and logic duplication.
Inside the conftest.py file, let's add the following code:
import pytest
import factory
from pytest_factoryboy import register
from rest_framework.test import APIClient, APIRequestFactory
from django.contrib.auth import get_user_model
from forum.models import ForumUser
from django.contrib.auth.hashers import make_password
from django import VERSION as DJANGO_VERSION
from django.test import TestCase
from django.urls import reverse


class ConfTest(TestCase):

    @pytest.mark.django_db
    def test_register_success(self):
        superuser = User.objects.create_superuser(
            username="admin",
            email="admin@admin.com",
            password="admin"
        )

        superuser.save()
        assert User.objects.count() > 0

    @pytest.mark.django_db
    def create_test_user(self):
        test_user = User.objects.create(
            username="test_user",
            email="test_user@test_user.com",
            password="test_user"
        )
        test_user.save()
        return test_user
Here's an explanation of the what we just added:
test_register_success(): First we create a superuser(to learn more about Django superusers read this article) and persist that user to the database. Then we query the database for that user using the assert statementassert User.objects.count() > 0, which proves that the newly created superuser is saved to the database successfullycreate_test_user(): This function is used to create a newUserinstances whenever the need arises to do so. For example when persisting aPostinstance anUserinstance is required for it'sauthorfield, therefore using this function to get anUseris a good use of the DRY principle(to learn more about the DRY Principle click here)
Next, let's move on to testing the models in this application. To do so, first create a new file inside the tests folder called model_test.py then add the following code to it:
import pytest
from django.contrib.auth.models import User
from django.test import TestCase
from blogapp.models import Category, Post
from conftest import ConfTest


class ModelTest(TestCase):

    @pytest.mark.django_db
    def test_category_model_persists(self):
        new_category = Category()

        new_category.name = "new_category"
        new_category.save()

        assert new_category.name == "new_category"
        assert Category.objects.count() > 0


    @pytest.mark.django_db
    def test_post_model_persists(self):
        new_post = Post()
        new_post.title = "new_post"

        new_post.author = ConfTest.create_test_user(self)

        old_post_obj_count = Post.objects.filter().count()
        new_post.save()
        new_post_obj_count = Post.objects.filter().count()

        assert new_post.title == "new_post"
        assert old_post_obj_count < new_post_obj_count
Now for a breif explanation as to what we have just added:
test_category_model_persists(self): This test case is for testing the ability of the Category class to save instances of itselftest_post_model_persists(self): This test case is similar to the one above with the addition of having to create an User object, as theauthorfield requires a foreign key of type User(to learn more about foreign keys click here)
Now let's move on to doing some basic unit testing for the routing in the application.
First, start out be creating a new file in the tests folder called routes_test.py. Then populate it with the following code:
import pytest
from django.contrib.auth.models import User
from django.test import TestCase
from blogapp.models import Category, Post
from django.urls import reverse

class RouteTest(TestCase):

    @pytest.mark.django_db
    def test_homepage(self):
        homepage_url = reverse("blog:MainView")

        response = self.client.get(homepage_url)

        assert response.status_code == 200
        assert response.context["request"].path == "/"

    @pytest.mark.django_db
    def test_no_access_page(self):
        no_access_url = reverse("blog:NoAccess")

        response = self.client.get(no_access_url)

        assert response.status_code == 200
        assert response.context["request"].path == "/noaccess/"
Now for an explanation of what we just added:
test_homepage(): Tests whether we are able to navigate to the homepage upon going to the route: "/". Notice that the functionreverse()is used to provide much of the same functionality as the well knownurl()method, in that it acts as a generator and alias for urls defined in theconfig/routes.pyfile(for more info on the reverse() function check out it's Django documentation page)test_no_access_page(): Very similar to thetest_homepage()test cases, with the exception of testing/noaccess/instead of/
Finally, let's add one more set of unit tests for the Post objects in the models.py file. Let's start by creating a new file called test_post.py in the tests folder. After that just add the following code to our newly created test_post.py file:
import pytest
from django.contrib.auth.models import User
from django.test import TestCase
from blogapp.models import Category, Post
from django.db.utils import IntegrityError
from conftest import ConfTest

class PostTest(TestCase):

    @pytest.mark.django_db
    def test_post_saves_when_author_present(self):
        new_post = Post()
        new_post.author = ConfTest.create_test_user(self)
        new_post.save()
        Post.objects.count() > 0

    @pytest.mark.django_db
    def test_post_not_save_when_author_empty(self):
        new_post = Post()
        with self.assertRaises(IntegrityError):
            new_post.save()


    @pytest.mark.django_db
    def test_new_post_has_zero_likes_after_saved(self):
        new_post = Post()
        new_post.author = ConfTest.create_test_user(self)
        new_post.save()
        assert new_post.likes == 0
Now for an explanation of we just added:
test_post_saves_when_author_present(): This unit test primarily tests whether instances of thePostclass can be saved when including a value for it'sauthorfield(which isnot-null)test_post_not_save_when_author_empty(): This unit test contrasts the one above in that theauthorfield is intentionally left blank in order to trigger anIntegerityError. The assertion contained in this unit test expects thisIntegerityErrorto be thrown when attempting to save thePostinstancetest_new_post_has_zero_likes_after_saved(): This unit tests is similar to the one above with the slight twist of checking whether thelikesfield has a default value of0when it'sPostinstance object is persisted with a blanklikesvalue
Now that we're done adding all our basic unit tests, let's run these test cases!
To do this just run the following command:
pytest -s
And voila! Here are the test results showing 9 successfully passing test cases:


Figure 2: 9 passing unit tests!✔ ✔ ✔
Conclusion
Congratulations! You now know how to make basic unit tests in your Django applications. If you need access to the source code for this application you can access it by visiting it's GitHub link.
Well that's it for this post! Thanks for following along in this article and if you have any questions or concerns please feel free to post a comment in this post and I will get back to you when I find the time.
If you found this article helpful please share it and make sure to follow me on Twitter and GitHub, connect with me on LinkedIn, subscribe to my YouTube channel.